Rendering and Preserving Lard
Some of you are no doubt throwing away a very valuable asset when you trim the fat from your meat. Before being subjected to the misleading marketing ploys of the USDA and their subsidized parties, lard was considered good for you. The fact of the matter is, it STILL is good for you—better in fact than canola oil and even butter. (See “Why Do We Get Fat” by Gary Taubes or “Ignore the Awkward” by Uffe Ravnskov) When I’m cooking a pork that has excess fat I trim some of the fat and set it aside and then preserve it later. I also do the same for beef fat (tallow), chicken and I also save the leftover bacon grease so long as I haven’t burned it.
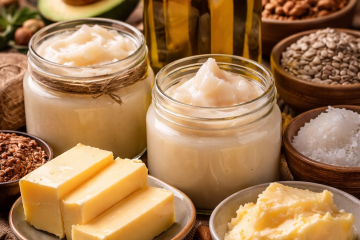
While I understand that much of what I’m saying here goes against everything you’ve heard growing up, you’re just going to have to get over it. They were wrong. Lard it good for you and that lard that you can create and preserve for yourself is MUCH better than the commercial lard that you can buy at the stores which contain canola oil—the very oil which is really, really bad for you. It’s also near impossible to get commercial lard without the addition of other hydrogenated oils (which CAUSE heart disease). So I’m all for making and preserving my own. Unlike margarine and vegetable oils, your homemade lard contains no trans fat which is part of the culprit for heart disease. Lard actually contains less saturated fat, more unsaturated fat, and less cholesterol than butter by weight. For decades it was preserved, sometimes seasoned with onion and garlic, and used as a spread on bread along with tomatoes or cucumbers. (And yes, butter is better for you than canola oil as well.) Up until the end of the 19th century, the fat on the pig was considered just as valuable as the meat.
In terms of using lard, you’ll find that it adds a taste and texture to your baked goods* so beautifully that you’ll wonder how you ever did without it. I use it for popping popcorn, or to spread on the outside part of a grilled cheese sandwich. I love using lard in my pie crusts, flaky biscuits and even sautéed vegetables. The crusts are so flaky because or the large fat crystals that are found in lard unlike any other fat. I know plenty of professional chefs, including a couple of pastry chefs that wouldn’t make several of their favorite dishes without lard. I love rendering my own lard because I can use instead of butter for many dishes and thus preserve my butter specifically for those occasions when I just have to have a creamy butter taste. Lard has a fairly high smoke point and is edible even after it’s reached that smoke point and produces very little smoke and a distinguished taste. I like to use the lard when making various soups, also as a binder for meatballs and meatloaf. I also use the crispy little bits (known as cracklings) that develop in the lard that’s rendered fresh from the pork in my sausages, meatballs, and hearty gravies. There’s a distinctive flavor there that you just can’t get anywhere else. Lard is used so widely outside of the U.S. that there was even a “Lard Shortage” in 2006 in the UK as a result of the demand in Poland and Hungary for it. Who knew, eh?! Here’s you’re throwing it away and yet there’s a bunch of Brits willing to pay top dollar for it. *grin*
Be sure to read all of the directions for rendering and preserving your own lard as there are a few different steps you need to take in order for it to be successful.
To make your own lard—known as rendering lard—you’ll start off by retrieving it from your cuts of pork. Remove all of the skin and meat that you’re able to. The smallest bit of burnt muscle or skin will ruin the flavor of your lard. I like to partially freeze mine as they are easier to cut then. My chef friends actually put it through a meat grinder. When I purchase it from the butcher, he’s actually kind enough to take the pork scraps and put it through his meat grinder. (Since I don’t have a meat grinder yet, I’m happy to let him!) If you’re cutting it yourself though, cut the partially frozen pork into small 1/2 inch cube sizes.
Next, you’ll need a heavy, large, shallow pan. I suggest using a large a cast iron skillet that’s nicely seasoned. Also, just in case I keep a large pan lid by the stove “just in case” there’s a grease fire that I need to tend to. I cover the pan with a handy dandy spatter guard to help prevent me from getting popped in the face. It’s got fine holes in it so that it doesn’t create condensation. I have a friend who I taught how to do this and she went out and bought herself a large electric skillet that had nice, deep sides so that she can do bigger batches in there and better control the heat. Yeah, she’s a show off like that. Great idea, right? I’ll have to keep my eye out at the garage sales for something like that.
You’ll want keep the pan you use at a steady, medium low temperature. Start off by warming the pan on medium low heat and then add ¼ cup of water. Then toss in your fat pieces. Remember, you do not want to fill the pan to full because you don’t want to risk it boiling over and having a grease fire on your hands. Add ¼ teaspoon of baking soda as you begin. This will make your lard whiter when it’s finished. You’ll want to stir the lard very frequently WITH A WOODEN or METAL utensil to prevent any meat bits (cracklings) from burning and anything sticking to the pan. Do not use ANY other type of utensil as it will melt. Your goal is to slowly melt the fat until it’s nice and clear. It will get a bubbly foam on the top of it, and then the bubbling with subside and what you’ll see are the cracklings that float to the top. As I see the cracklings develop, I spoon them out of the pan because I don’t want them to burn and put an unpleasant flavor in my lard. Once the bubbling had completely stopped, I turn off my oven heat.
The water helps the fat to not stick to the bottom of the pan and it boils off as the lard melts. USUALLY when the water has boiled off your lard is ready, but that’s not always the case. In fact, you may end up adding more water as time goes. Just watch for whether or not the fat seems to be sticking; if it is, then carefully add a little bit more water a ¼ cup at a time. You’ve got to be patient with this process as you don’t want to burn or scorch the pork fat. I do this process in batches, never putting in more pork fat than what can be spread out in the pan and not be any deeper than ¾ to 1 inch thick. Again, never add new fat pieces to a batch that’s already underway. You need to hit a temperature of 245-255 degrees Fahrenheit for the oil and you will compromise that if you keep adding more fat to the batch not to mention the splattering that you’ll have to endure. Do not allow your lard to get above 255 degrees Fahrenheit. Do this process singularly, batch by batch.
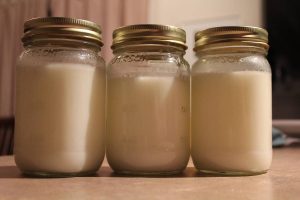
As the pork fat becomes clear, I take a METAL ladle and ladle it out, over a small metal sieve that’s securely set on top of my canning jar. To prevent the jars from cracking and to ensure that they are properly sanitized, you’ll need to have your jars set in a warm oven at 100-200 degrees Fahrenheit. As you are ready to ladle the clear lard out of the pan, you’ll take a jar from the oven, place it on a tea towel, and place a metal sieve on top which will prevent any of the small bits from going in your clean lard.
You’ll want to stir the lard as it cools in order to avoid a grainy texture. When you whip it or stir it while it cools, you’ll have a beautiful texture that will rival ANY commercial lard you’d ever purchase. (Yes, this part gets a bit tricky while I’m doing multiple batches of lard. This is about the time I yell “Honey?! Can you please come help me?”)
When the lard is completely cooled, meticulously wipe off the rims of the jars to ensure that no pieces remain. Then place a warm, lid right out of the boiling water on top of your jar. Fill each jar with just standard head space beginning right at the ring marks. Place a fresh sage leaf on the top of your cooled lard.
To preserve, you’ll use the pressure canning method of 100-120 minutes at 10 pounds of pressure. (Follow your manufacturer’s instructions for high altitude.)
I take all of the cracklings, cool them down, and then freeze them until I’m making homemade dog food, cat food, spaghetti sauce, chili or other hearty soups. It’s so fun watching someone try to put their finger on this luscious taste of those dishes and just missing it—especially the dogs. *grin* You’ve never had the best cornbread until you’ve had cornbread made with the leftover cracklings from rendering lard!
The best source of pork fat for lard is what’s called the leaf and kidney fat. You can also use fat from any of the sellable trimmings. In fact, you can use just about any fat found anywhere on the pig just fine EXCEPT for the fat from the mesentery or caul (round the stomach), and the fat round the gut (ruffle fat). This part of the pig is unpleasantly odorous and darker in color—just not appealing in any way, shape or form UNLESS you’ve freshly butchered the pig from which the caul and fat round originate AND have thoroughly washed with no chance of the innards polluting them. I won’t even use it to make my pet foods. But you can make good soap from this fat. (I know, that sounds ironic that the smelly part of the pig makes good soap, but it’s weirdly true.)
You can also warm your fat in the oven for about 24 hours. This method obviously ties you to home for a long period of time AND it will eliminate the amount of delicious cracklings that you’ll get. (When seasoned with salt they are a bit addictive) It’s fine if something interrupts your heating process. Just cover it and start over again the next day—but no longer. It’s actually safer to do it in the oven but I just don’t like that particular time commitment.
You home-canned lard will last for years and years so long as you store it in a cool, dry place. If you have any water remaining in your lard batch it will cause it to go rancid. Rancid lard can still be used to make soap, but I wouldn’t recommend using it otherwise. Once it’s gone rancid, like Canola oil, it’s bad for you.
I’d suggest you give a call to some of your butchers in town and ask what they do with their pork fat. I’m willing to bet good money that you’ll find butchers who will GIVE you the pork fat. At the very least, it’s worth calling to see if you can’t purchase some for a great deal. You may also want to contact the professional butchers who butcher farm animals and inquire whether or not they are willing to sell the fat to you. Try getting BUTTER free or cheap like that! *grin*
Note: I have had friends do this process in much larger batches. But this is the way Grandma always did it and I just don’t want to risk it. The more fat I have in there, the more fat I can ruin at a moment’s notice. So I prefer to keep the batches small. I usually start this right before I’m making dinner. By the time dinner’s done, I’m ready to put the jars in the pressure canner and the canners’ done by the time I’m ready to retire for the night to read or what not.
Hot tip: If you use strong smelling foods such as onions, the next time you go to warm up your lard for deep frying, put a few slices of raw potato in the cooled lard as you begin heating the lard back up. Fry the potatoes until well browned which will help absorb the flavors/odors.
Never heat your lard above 400 degrees Fahrenheit and be sure to clean out food particles of the burnt piece will unpleasantly flavor your fat.
* When you’re using lard as a substitute for shortening add a ½ cup extra flour for every ½ cup of lard you use.
65 Comments
Penny · September 29, 2012 at 3:36 am
Thank you for this great article!!! I never knew you could do this and can it! What a great recycling idea! And talk about saving money!!!
Sue · September 29, 2012 at 5:21 am
Can you post the link referring to the health qualities of lard vs. canola oil, please? It may be difficult to convince my family without good references. Is lard still “better” even if it is from a pig farm that, inevitably, uses antibiotics, etc., to prevent health problems in their herd? And, Thank you for these instructions. It’s good to know.
Kellene Bishop · September 29, 2012 at 8:24 pm
Sue, I’ve posted a link in the article to another article on Canola oil as well as two books I suggest reading.
Kellene Bishop · September 29, 2012 at 8:35 pm
Sue, also know that when you get canola oil, due to its process it’s already in a rancid state. It’s why fast food joints have to use a perfume in their oil vats everyday so that the smell doesn’t repel customers. It’s such a dark, insidious world out there when it comes to either governments promoting and subsidizing a particular food. Clearly they have forgotten their place as a government.
Suzie Q · October 1, 2012 at 2:45 pm
I’m 65 so I grew up eating lard as normal. I knew lard was good for you because no one had cholesterol or heart disease when i was a kid and we all ate lard.
30 years ago, we raised 2 pigs with our dairy goats and had them butchered at our local butcher shop. We got 5 gal of lard from it. (just to give you an idea of quantity of lard for a pig).
Regarding canola oil. All of it is now polluted with GE canola. Watch what the farmers are saying about it in the DVD, “the Future of Food”. Stop eating anything with Canola or Soy.
LRMoudry · September 29, 2012 at 8:09 pm
How timely for me was your article on Rendering & Preserving Lard!!! (I think you must be peeking over my shoulder sometimes because this has happened before!!) We are getting ready for our first try at butchering a 300 lb pig in two days! My son was commenting last night that he wanted to try saving/rendering the lard and remarked we needed to get on line to see if we could find some directions for that! Lo and behold, this morning I get on line and there is your article stareing me in the face! Thank you so much!!!
For once, I can share a tip with you also! You remarked that you don’t have a meat grinder. I have had a Bosch mixer for 40 years and have the meat grinder attachment for it. I am an avid cheerleader for Bosch mixers altogether! The mixer itself is fantastic and with the attached meat grinder it has ground it’s way without one hitch through 2 Alaskan moose (which means over 1000 lbs each!), 5-6 antelope, 5-6 deer, and I have for many years bought beef roasts on sale for less than the per lb cost for hamburger and I grind my own. So this mixer has ground I can’t imagine how many hundreds of pounds of meat over the 40 years! I just this year had to finally buy a new blade for the grinder as it was getting dull. Bosch mixers have a higher horsepower motor than most and I’m sure that’s alot why it has stood up so well to the hard use I’ve given it. And it’s still going strong!
So……….give some thought to a Bosch mixer and grinder attachment! You won’t be sorry ever!
Kellene Bishop · September 29, 2012 at 8:33 pm
Great minds DO think alike, then, eh? *grin* You’ll get about 15 pounds of lard from a pig that size. Sounds like I need to save up and put the meat grinder attachment on my list then. Thanks!
Kris · September 29, 2012 at 10:51 pm
Just read your posts on canola oil. No wonder we don’t feel so good after having a fish fry! What do know about peanut oil? Would it be ok to use occasionally? It would cost alot to use coconut oil in a big fryer. I know its not that good for us but we enjoy a good fish fry now and then.
Nick · September 30, 2012 at 1:34 am
Kellene, do you prefer lard over coconut oil in some instances, or vice versa? I’m about to make my first large-ish purchase of coconut oil but have yet to buy any lard. What’s your personal storage ratio between coconut oil and lard?
Kay Leen · September 30, 2012 at 1:47 am
I’m so glad you put this out their. I’m wondering if the same thing can be done with chicken fat.
Carrie · September 30, 2012 at 3:23 am
Thank you, this is a wonderful article on making your own lard. It sounds a little difficult to a simple mind like mine. Is it tricky for a beginner?
Jill P · September 30, 2012 at 3:51 am
I render fat in a crockpot. It’s really easy and you don’t have to worry as much about the temp getting too high.
Sharon · November 16, 2012 at 12:22 pm
How do you render your fat in crockpot
countrygirl · September 30, 2012 at 4:04 am
Good article. I’ve only rendered bear fat in the oven in a cast iron roaster. I did not even think about canning it and that is a terrific idea. Any reason why you only talk about rendering pig fat. The process would be the same for any fat, I’m just wondering why, wouldn’t beef fat render the same?
Kenneth & Patricia · September 30, 2012 at 4:30 am
Dear Kellene & Scott,
Keep up the good work!!! Ever since Vietnam, I’ve been prepping in one form or another. I made it a point to learn as many old-time techniques for doing things as I could, just in case everything fell apart. I’d been prepping in several areas–guns & ammo, medical supplies, etc., but one of the most important parts I’d left out. It wasn’t until I saw your program on NatGeo that I realized I didn’t have food staples stockpiled. I recorded that program & have watched it dozens of times to glean every hint I could on what I should be doing. Since your program aired, we’ve been putting aside oats, pinto beans, rice, & corn, & what canned goods we can afford to buy. Your program was timely & a real Godsend. Thank you so very much & keep sending the hints on how to make food shelf-stable.
Sincerely,
Kenneth & Pat St. John
Kenneth & Patricia · September 30, 2012 at 4:30 am
P. S. Where do you get your powdered milk & cocoa from?
Louise Raven · September 30, 2012 at 4:46 am
I got hog fat from the market in town and rendered it in a big pan on a hot plate outside. I just put the chunks (6″ x 6″ or whatever) of fat in the pan with no water and turned it on low and walked away. I like that better than trying to do it inside. Did not can it and can see that would be good. I just put a couple of quarts of the lard in the refrigerator and it kept fine for a year +. My 11 year old daughter caught a greased pig at the fair this year but she says we can’t kill and eat it until she (my daughter) dies! Might be a good long while!
Kellene Bishop · September 30, 2012 at 5:26 am
Five Star Preparedness has both…be sure you ask about their Thrive Powdered milk…my favorite.
Kellene Bishop · September 30, 2012 at 5:28 am
Actually I mentioned that I preserve all kinds of fat, however this article is about lard which is pork fat, whereas other fats are usually known as tallow and have different nutritional statistics and different processes, in my experience.
Kellene Bishop · September 30, 2012 at 5:29 am
Chicken fat doesn’t have the same impact on baked goods and such. It also doesn’t liquify quite the same. I just keep it in the freezer and use it for extra flavoring.
Kellene Bishop · September 30, 2012 at 5:32 am
I use the coconut oil for things that I want fat but to taste fresh such as salad dressings.I use the lard as outlined in the article. Don’t buy ANY lard until you verify that it doesn’t have hydrogenated oils in it, and specifically without canola oil. It’s so much cheaper getting the fat the way I mentioned in the article.
Kellene Bishop · September 30, 2012 at 5:32 am
I use peanut oil to deep fry my turkey and for stir fry dishes.
Jill Pruitt · September 30, 2012 at 10:08 am
This is something I’ve wanted to try for a long time but it sounded to tricky. Thank you for taking the mystery out of it and letting us know the tricky spots. As always, your “heritage skills” are most welcome.
Darlene · September 30, 2012 at 10:47 am
I’ve rendered 13 pints of lard so far this year from 2 hogs I raised for butcher. There’s another 8 pounds in the freezer left to do. Question: Why do you say to put a fresh sage leaf on top of the fat before canning it?
Kellene Bishop · September 30, 2012 at 11:50 am
It keeps it nice and fresh and works well with the baking soda. Grandma used it in lieu of a bay leaf.
Simone · October 31, 2013 at 12:22 pm
Could you explain this
Could you explain this comment. Works well with baking soda..how so? How did Grandma use it in llieu of a bay leaf. Just curious. I made my first batch. Canned it in my pressure cooker. One bag of lard (we got 3 from our 350 pig we raised ourselves, we raised 4 with friends and 2 went to 4H) renedered 8 pints of snow white lard and quite a bit of cracklings. I think probably 4 cups. It went really well. I am pleased 🙂
Elizabeth · September 30, 2012 at 7:40 pm
Great article. I figured out awhile back that animal fat is not only tasty but tons healthier than fast food, in moderation, of course. Here I my little gift: throw a whole chicken in a crock pot with the usual diced veggies (carrots, celery, onion). Cook unil done. Remove the chicken, leaving the juices and veggies. Now stir in a bag of dressing or stuffing or whatever you call it in your part of the world. Tastes amazing and the fat makes it so moist and flavorful. English Yorkshire pudding starts with bacon grease in the bottom of each muffin tin. In the South, real cornbread is cooked in cast iron with the pan greased in bacon grease. Thanks so much for educating folks on important topic. I learned alot today.
Brenda · October 1, 2012 at 1:46 am
I grew up on a dairy farm in the mountains of southwestern Virginia. In the fall, we always slaughtered one of our hogs and my mom made lard (in the oven at a low temp), scrapple (never liked it – yuck), smoked hams, salted bacon and such in the smoke house. I have never outgrown a garden and canning my harvest. I can remember my mom canning pork tenderloin and sausage. I married a city boy 25 years ago. I knew that my knowledge would one day come in handy. I now teach homesteading and prepping classes in my home twice a month around homeschooling my last 2 teenage boys. I love your website. Thanks
Rachael · October 1, 2012 at 12:57 pm
I love your posts! Amazingly helpful!! I don’t have a pressure canner and have gotten by with my vegetables and jellies by sealing and flipping upside down (letting them cool for 24 hours)…could this process be used with lard?
Kellene Bishop · October 1, 2012 at 8:29 pm
You definitely need a pressure canner for lard.
Grandpa · October 2, 2012 at 6:58 pm
Within 50 miles of our home there are 5 facilities that do custom meat processing ( including the killing if you’re squeamish or tenderhearted). Most rural areas will be similar. Just ask at the local store/gas station. Many will give you all the fat you can use free and will grind it for you. (ground renders more readily).
During hunting season you might have a harder time getting pork fat as it is added to the sausauge the hunters want made from their game animals.
Tried the crock pot last year out on the porch, worked well, but it doesn’t help season any new dutch ovens.
Fats used to be a very important multi-use commodity: cooking, candles and lamps, soap, various salves, hand lotion ( 1/2 fat-1/2 soft pine gum heals hands, diaper rash, and saddle sores, better than anything store-bought), waterproof and preserve leather, preserve wood handles on tools and sealing wood bowls and cutting boards, lubricate bullets, grease thin-scraped hides to make translucent window covering that allow light in, grease axles, wax skiis, etc.
teri · October 4, 2012 at 4:01 pm
I want to can my bacon grease in small jars (with the brown bits from the pan). I was wondering if it would keep very long due to bits of meat.
Anthony · October 7, 2012 at 5:09 am
Kellene, or anyone… have experience making lard from bear fat? Any voices of experience? Our region has many Black bears in our well managed populations. My previous attempts will improve quite a bit with your tips & techniques, especially the whipping part to avoid crystalization, thank you. A decent black bear this time of year yields a 5 gallon pail of pure white fat. The flavor is very mild, the animals themselves, quite like pork.
Kellene Bishop · October 7, 2012 at 7:30 pm
Yes, indeed. One of our gals on FB did bear fat the same way.
Dakota Rasnake · January 2, 2015 at 6:41 pm
I too am trying to render
I too am trying to render bear fat although I will not be using it to cook with I need it for a lye soap and bullet lube experiment that I’m working on. But my finished product is not nice soft solid but yellowish oil that separates out and it has a strong smell to it. What am I doing wrong? I need it to be solid at room temp. The smell I could do without as well. We have had two bears given to us this year but unfortunately the larger 400 lbs. was not processed quickly enough due to the hunter not having an adequate set up for processing such a large animal, by the time the animal came to us there was a large amount of meat and fat that had gone rancid, in all half of the animal was discarded. This kills me because we hate to waste any animal that we hunt. So I need to get this right as too not waste any more.
Cat · February 5, 2016 at 4:05 am
I found out when I rendered
I found out when I rendered down some bear fat when i didnt get all the water out it turned yelbow too and smelled. After much research I found out it was because when I water-rendered I wasn’t getting all the water out. I dry rendered and it turned out odorless and pearl white, beautiful. That might be your problem….might not be getting a the water out. I also render it down in a cast iron Dutch oven at low heat.
Lynette · October 20, 2012 at 6:36 pm
Have you ever tried rendering lard or melting cheese wax in a solar oven?
Kellene Bishop · October 20, 2012 at 6:53 pm
you never want to leave hot/warm cheese wax unattended. It’s flammable. Nope, I’ve never bothered with the lard in the solar oven. It would take a little more time and I’m one of the laziest preppers in the world. 🙂
d · October 29, 2012 at 10:05 pm
I used a crockpot for my rendering WHEN I can find pork fat. I’ve visited every butcher in my area, and they all get their pork in cryovac packs already quartered and trimmed.
I’ve found that if you speak with your grocery store butcher, they may be willing to set aside trimmings for you to pick up. Mine now does it when I ask, netting me about 2 pounds of trimmed fat per day. Free.
Thanks for the article.
db
Marie James · November 6, 2012 at 3:49 pm
Thanks for this primer! We raised our first pigs this year and have all the lard in the freezer, ready to render. We linked to this article on our blog post “Beating Food Challenges: Storing and Preserving Foods.” http://rurallivingtoday.com/quality-of-life/beating-food-challenges-preserving-storing-foods/
judy · December 6, 2012 at 12:16 pm
i loved your lard rendering instructions. the thing is , do you really pressurecan it for 100-120 minutes? it just seems such a terribly long time. how much water do you put in the canner to last that amount of time?
Kellene Bishop · December 7, 2012 at 12:49 am
Just, everything I pressure can lately has been 90 minutes. 2 to 3 inches of water in my pressure canner works just fine. I’d suggest that you reference your instruction manual for your specific canner though. As my niece always says “Don’t worry. It’s not scary.”
Danelle · December 29, 2012 at 3:30 pm
My mom always cooked with Lard, as did my grandma before her, and we were never unhealthy as kids or adults. I use lard in my cooking as well. It makes AMAZING sugar cookies!! I completely agree with you: Foods seem to just taste better using lard. I had never made my own lard, though. Thanks for the tips! I will give it a try now.
Deborah Brazil · January 11, 2013 at 1:41 am
Kellene, would you render tallow(beef) the same way? My daughter’s fiance’ often works on his grandfather’s ranch and they never want for beef. Would you use the tallow the same as the lard? Baking etc? Just curious.
Preparedness Pro · November 9, 2015 at 7:11 pm
Yes, I’d do it the same way.
Yes, I’d do it the same way.
Kellene Bishop · January 11, 2013 at 3:51 am
Yes, I would.
judy · May 22, 2013 at 2:34 pm
kellene, im a little confused. do you pour the hot lard into the jars and stir as it cools, or do you put it in the jars after it has solidifies? cant wait to do this just a little nervous
Wendy · July 13, 2013 at 9:45 pm
Rather than stirring the fat in the jar, could you put it from the pan into a mixing bowl, turn the mixer on very low, whip it that way, then distribute into jars, reheat, and then pressure can it? Or would the added air cause headspace issues?
josh riley · August 18, 2013 at 4:35 am
Is this a liquid lard?Can you use this as biodiesel?
Preparedness Pro · October 31, 2013 at 10:16 pm
Simone the comment you are
Simone the comment you are referring to I believe is in relation to the use of baking soda in the lard to whiten it and Basil being used instead of a bay leaf on top of the jar before you pressure can it. ( by C for Prep Pro)
Ginger McCarty · November 9, 2015 at 6:19 am
OK, I get the baking soda,
OK, I get the baking soda, but never heard of a bay leaf on top? What is that for? And I’m a bit confused…pour it in the jars BEFORE your mix it? Do you whip it in the jars? What happens as you reheat it during processing…does it get grainy again?
Preparedness Pro · November 9, 2015 at 6:44 pm
Bay leaf is also a
Bay leaf is also a preservation herb. Some use it in lieu of a oxygen absorber.
Lisa · April 4, 2014 at 4:49 pm
What does the sage leaf do?
What does the sage leaf do? Will it flavor the lard when canning? How much time for pints for canning? Do I need to stir and cool it before canning it? Or justif I am putting it in the fridge?
Thank you Kellene!
Preparedness Pro · November 9, 2015 at 7:11 pm
It simply helps keep the lard
It simply helps keep the lard smelling fresh instead of “stale”.
laurene mccune · July 23, 2014 at 2:36 am
Please get your lard from
Please get your lard from local farm butchers. Pesticides and chemicals settle in an animals fat, so it is more concentrated .
Rochelle Lerner · September 30, 2014 at 7:18 am
I’m new to the whole eating
I’m new to the whole eating lard concept, and I found this post very interesting. Having never eaten lard, that I’m aware of, I would like to know… after you open a jar, does it need to stay in the fridge? Or is it like Crisco and can be put back in the pantry?
Preparedness Pro · September 30, 2014 at 2:09 pm
Mine stays on my counter, but
Mine stays on my counter, but my grandmother put hers in the refrigerator.
Robbie Bianchi-Pray · December 11, 2014 at 8:59 pm
I was ladling off my lard and
I was ladling off my lard and walked away… When I returned the lard started smoking… fortunately most of it had already been harvested. The lard that smoked is darker in color and I am curious if it is ruined? It did smoke so curious if that makes it toxic?
Preparedness Pro · December 12, 2014 at 7:07 pm
I wouldn’t use it my dear.
I wouldn’t use it my dear. Sorry. Only use that which you ladled off.
toolie · September 10, 2015 at 8:52 pm
I have rendered and used lard
I have rendered and used lard forever from my own pigs. I use it for cooking and have made my own lard/lye soap forever.
You are what you eat…Better fed hogs make better meat AND better lard.
I disagree about using rancid lard for making soap. Not a good idea. Once again, the quality of the lard makes the quality of the soap.
Good lard – good soap.
Bad lard – bad soap.
I would not go to all that work making soap to get an inferior product.
Elinda Woods · February 29, 2016 at 9:44 am
You are the only site I’ve
You are the only site I’ve discovered on the internet that stresses getting all the water out of the lard by taking the temperature to 255 degrees.
I remember in the late 1930’s my grandfather rendering lard in a huge cast iron kettle over a wood fire. {the same kettle would also be employed to cook scrapple, apple butter, etc.).
Grandfather would get the lard rendered to a certain point, my guess approximately 200 degrees, based on my subsequent lard rendering process.
elindawoods · February 29, 2016 at 11:06 am
Up to this point a gang of us
Up to this point a gang of us kids knew not to permit the wood paddle stirring to stop for a second, we used a sheet of propped up roofing tin to protect our shins from the intense heat from the fire. Grandpa wasn’t a tyrant be any stretch of the imagination, but had an innate aura of authority about him that one sought to do ones best in his presence.
At this point all the crackings would be removed and run through the lard press, the clear oil being returned to the kettle.
The fire would now be near the charcoal stage which would be hollowed out in a concave roughly matching the curvature of of the bottom of the kettle so the heat emitting be dispersed in a nice even fashion.
The oil was then heated until the surface was dead calm.
Adult women then took over, ladling oil into what I would guess to be 4 gallon crocks. their long cotton dresses protecting their legs from the scalding oil. At all the farm auctions I’ve been to, never ever saw another ladle as large, it had to hold over 3 quarts which made the filling process quick.
The lard was not stirred in the crocks, once the lard had cooled about an half inch layer of paraffin wax was poured over to seal and the crock lid put on. Then the crocks were moved to the coolest part of the house basement.
Grandmother kept a working crock of lard behind the door that led to the basement. When needed she merely scoop out the amount needed, this occurred several times a day.
Lard will store for a very long time.
My brother bought a farm in the 1950’s, in 2002 his children were removing the old shelving the once held the immense store of canned jars of every description. In a space underneath the shelves, which had been boarded over (ostensibly to keep the area cooler) they found two crocks of lard.
Surprisingly, the lard underneath the paraffin was in perfect condition. The only problem despite the paraffin the was a definite musty odor, not horrible, but enough to be easily noticed.
Thre was no reason to, but if a process could be found to deodorize the lard, I feel it could have been used.
This was a potato digging time and I thought about kettle cooking some potato chips in a cast iron kettle over an open fire, but ultimately decided not, because I feared perhaps some unknown detrimental change in chemistry could have occurred.
I still keep the lard we render in crocks (somewhat smaller ones) and never experienced a problem.
In today’s era, putting lard up in glass canning jars seems like a prudent thing to do. Today folks don’t experience a germ load like farm work entailed and are less likely to tolerate anything coming from outside our “clean” environment. When I was a young it seemed the family’s with the dirtiest children were the most healthy. I often jokingly remake the today’s children are too clean — perhaps something that preppers might give some thought to.
Janet · March 19, 2016 at 6:41 pm
What I want to know is where
What I want to know is where people find butchers. I’ve asked at the grocery store and they get annoyed and say no to all the things people say butchers will have or will do for a customer.
Preparedness Pro · March 20, 2016 at 11:49 pm
Check online for Amish,
Check online for Amish, Mennonite or the like type of communities near you if you can’t find butchers in your area online directly. Those communities always have a commercial butcher or two.
I’ve always been near farming communities, and those that raise cattle always have a butcher/processor to handle their meat. You might want to ask them as well.
Sarah · February 15, 2017 at 6:12 pm
Love the info. I have done 2
Love the info. I have done 2 batches (before reading this article) and I had to re heat both( I think the temperature was not high enough) I used no water and poured the hot lard into hot jars and sealed. It turned out ok and was kept in the pantry. Why should you not heat the lard above 255? And is it bad not to pressure can it?
Comments are closed.